For timelapse photography, it’s very important to know which intervals are possible with your equipment. In situations with fast-moving subjects, short intervals are often recommended for aesthetic reasons. Examples are Northern Lights, fast-moving clouds, urban scenarios with moving people, shots from fast-moving vehicles, or when you use longer focal length lenses (since this amplifies the movement).
In many situations, it’s important to use the longest possible exposure time within a defined interval (or the shortest possible interval for a defined long exposure time). This is used either to create smooth motion blur (similar to a large shutter angle in filming) or to get more light on the sensor to reduce the noise in night scenes. Examples are time-lapse sequences of the milky way or in glow worm caves.
The camera, the intervalometer, and the settings all have a huge influence on the possible intervals and exposure times.
Camera
This test was done with the Sony A7SII camera which is in my opinion very well suited for timelapse photography, at least if 4K is sufficient for the final output (for 6K or 8K you need different cameras like the Sony A7RII).

The big advantage of the Sony A7SII (besides its small size, good dynamic range, and high ISO performance) is, that the file size of the images is quite small (due to the 12MP sensor), which helps a lot if you shoot many timelapse sequences on longer trips. For example, if you shoot with the A7RII 100 time-lapse sequences of 1000 images each in uncompressed RAW, you get about 10 TB of data, which is not easy to handle (and back-up) if you are on the road.
I’ve tested different SD cards (all SanDisk of different generations and speeds) with the A7SII and found no significant influence of the SD card on the possible intervals with this camera. For the test results below a SanDisk Extreme Pro 512GB UHS I SD card with 170MB/s was used.
It seems that also the choice between compressed RAW vs. uncompressed RAW has no real influence on the possible intervals. The quality of compressed RAW files is in my opinion sufficient for any timelapse application and the smaller file sizes are very welcome. Therefore I use compressed RAW for timelapse (and uncompressed RAW for still landscape images).
The camera setting with the biggest influence on the shortest possible intervals is Auto Review (this option defines if images are automatically shown on the camera display after each exposure). With Auto Review set to Off much shorter intervals are possible with the A7SII.
Another setting with a slight influence is the choice between an electronic shutter (Silent Shooting=On) and a mechanical shutter. With the electronic shutter, you have slightly better choices of possible combinations between exposure time and interval time (see below for the test results). Also, using the electronic shutter removes any wear from the mechanical shutter. The average shutter life expectancy of the A7SII shutter is 200000 actuations. If you shoot a lot of timelapses this number can easily be reached within a couple of years.
The disadvantage of silent shooting is that the electronic shutter scans the scene line by line instead of taking an instant snapshot which can lead under artificial light to artifacts and also to distortion of fast-moving subjects (known as rolling shutter). The electronic shutter can also influence the bokeh of a lens and the evenness of the exposure within an image when using very short exposure times below 1/1000 sec. (which are rarely used for timelapse).
These are the typical camera settings I use on my A7SII when shooting timelapse with an external intervalometer:
– Exposure Mode: M
– RAW File Type: compressed
– Focus: Manual Focus
– SteadyShot: Off
– DRO / Auto HDR: Off
– Long Exposure NR: Off
– Lens Compensation: Off for Shading, Chromatic Aberration, and Distortion
– Auto Review: Off for the shortest possible interval, On if you want to change exposure settings directly on the camera during the sequence
– Silent Shooting: On, if the subject isn’t moving too fast and there is no artificial light, otherwise Off + EFC On
Intervalometer
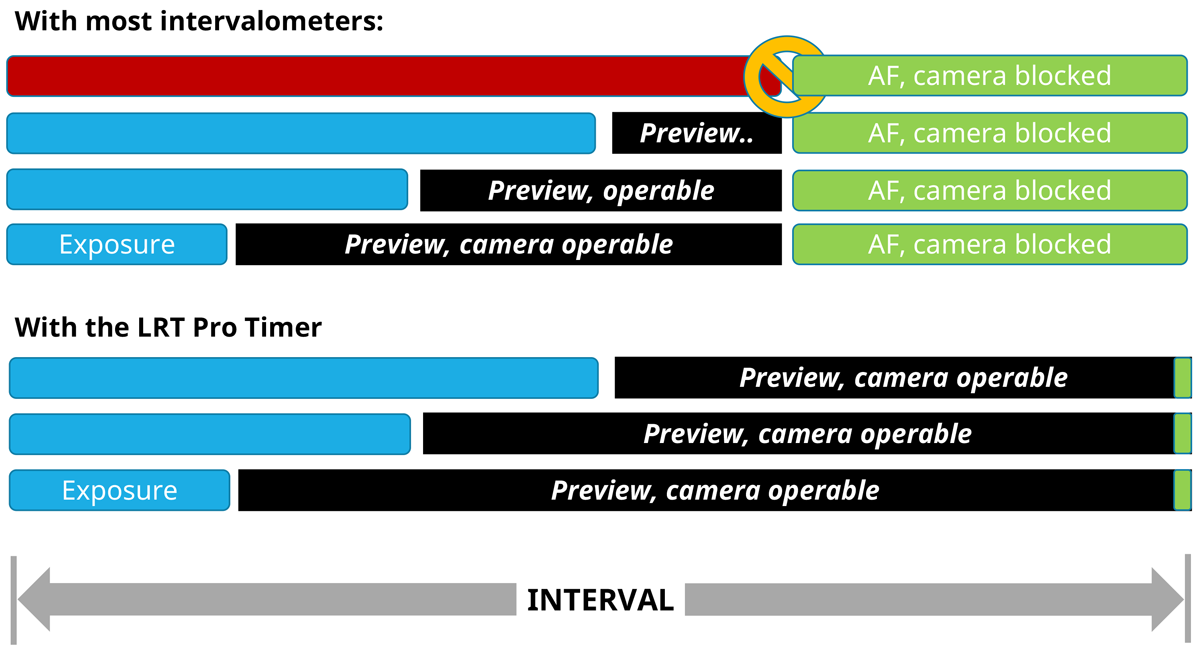
The intervalometer triggers the shutter of a camera at certain pre-defined intervals. There are several external intervalometers available. The problem with most of them is, that they send out a very long AF signal (often 1 second or longer) before triggering the shutter. This leads to a significantly longer dark-time (see definition below).
The best external intervalometer is currently the LRT PRO Timer 2.5, designed by Gunther Wegner, the developer of the well-known time-lapse software-tool LRTimelapse.
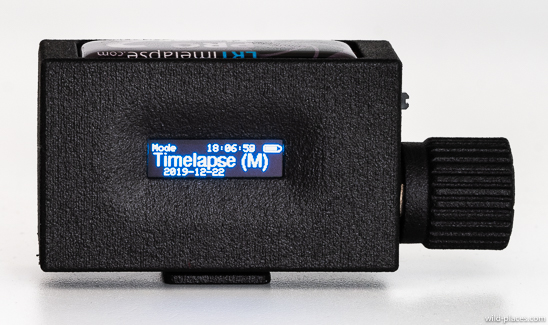
It is small, light, easy to operate, can be charged via USB, is highly configurable, and allows interval ramping. And best of all it allows very short dark-times by reducing the pre-trigger AF-time (see image below).
(Source: LRTimelapse.com, with friendly permission by Gunther Wegner)
It can be ordered online at Amazon (for 179€/229$). It’s a well-designed product and highly recommended. You can find all the details about this product and the buying options here.
On the PRO Timer, you can customize the values for Release Time (default 200ms) and Autofocus Time (default 100ms) as well as many other settings. I tried different values, but for the A7SII the default values seem to work best.
Terminology
Interval time: The time from the beginning of one exposure (shutter opens or photocells are reset if you use an electronic shutter) to the beginning of the exposure of the next image (shutter opens again). The interval time in a sequence is often fixed but for certain scenarios (for example day-to-night timelapse) it could also make sense to change the interval time during the sequence (interval ramping).
Exposure time: The meaning of exposure time for timelapse is identical to still photography (and video) and defines the time between the beginning of the exposure (shutter opens) and the end of the exposure (shutter closed). The exposure time can be fixed throughout a sequence but for a day-to-night timelapse it is typically adjusted during the sequence according to the ambient light.
Dark-time: The dark-time is the difference between the interval time and the exposure time. During the dark-time, the camera must save the picture on the SD card and, depending on the camera settings, show the image on the display and/or accept manual changes of exposure parameters (and/or transfer the image to an external device, see below). If the time necessary to do these operations is longer than the available dark-time you will either lose frames or block these operations. Therefore in the context of this blog post, the definition of dark-time is the shortest available dark-time where you don’t lose frames and are able to do all the necessary operations for a certain setting.
Manual Adjustments
With many cameras, if the exposure time is chosen too long for a certain interval or the interval too short for a certain exposure time (dark-time is not sufficient) this blocks any manual adjustments of either exposure time or ISO. The problem with the Sony A7SII (and most of the other A7x cameras) is, that long before the adjustment is completely blocked, the camera starts to lose frames during the timelapse sequences if you do any manual adjustments.
Therefore it is very important to know the limits and never try to do any adjustments outside of these limits. Often in a sequence, only one or two frames are lost but this can nevertheless ruin the whole sequence. You can find the limits of the A7SII for manual adjustment with 5 sec. and 10 sec. intervals below in the test results.
ControlMyCamera App
ControlMyCamera is an app for iOS smartphones and tablets to control your camera via WiFi. For Android devices, the same app is available under the name qDslrDashboard. It includes a special LRTimelapse view and allows changing of exposure time, ISO, and aperture without touching the camera. It also allows the transfer of images shot during a time-lapse sequence to your smartphone and presents these images with a detailed histogram. That way you can switch the auto review on your camera off (to reduce the battery consumption and reduce the necessary dark-time) while still being able to evaluate the histogram of your shot images during a sequence. You can easily adjust the exposure of your camera with your smartphone if the ambient light changes, based on the provided histogram information.
To connect your smartphone (with the installed ControlMyCamera app) to the Sony A7SII you first have to activate the Smart Remote Control app on the camera.
Sadly some camera settings made outside of the Smart Remote Control app are ignored if you activate this app. Therefore it’s very important to make certain settings directly in the Smart Remote Control app (for other important camera settings outside of the app see above):
Image Size: S
Quality: RAW&JPEG
Metering Mode: Multi
White Balance: daylight, cloudy, or a fixed value
DRO / Auto HDR: Off
Creative Style: Standard
Silent Shooting: On, if the subject isn’t moving too fast and there is no artificial light, otherwise Off + EFC On
The settings RAW&JPEG and image size S are important if you want to review your images during a sequence on the smartphone and want to have the shortest possible dark-time. This way only small JPEG images are transferred between the camera and the smartphone which are completely sufficient for histogram evaluation.
The app also has some very powerful functions integrated which allow fully automatic day-to-night timelapse sequences. Exposure time and/or ISO and/or aperture can be automatically adjusted by the app based on the ambient light (by analyzing the histograms of the shot images which are transferred from the camera to the smartphone). Contrary to the PlayMemories app (see below) with the ControlMyCamera app you are able the adjust the overall brightness during a sequence even in fully automatic mode by manually adjusting a reference value.
Here are some links with lots of information on how to use this app, especially for timelapse photography:
https://dslrdashboard.info/
https://lrtimelapse.com/dslrdashboard/
It’s not recommended to use the integrated intervalometer of the ControlMyCamera app since it is less reliable than a good external intervalometer (due to the WiFi connection). Therefore the best combination is to use the PRO Timer as an external intervalometer and the ControlMyCamera app to adjust the exposure during a sequence. Interestingly this combination allows for certain settings even better dark-times than a manual adjustment directly on the camera (see test results below).
But as with the manual adjustment directly on the camera you have to be very careful in choosing the right combination of exposure times and interval times. Otherwise, you will lose frames. Controlling the A7SII during a sequence via the ControlMyCamera app has the same problem as the manual control of the camera: with the wrong dark-time, you will lose frames before any operation is blocked!
PlayMemories Timelapse App
This is an internal time-lapse app from Sony that has to be bought separately for 9,99€ on the Sony PlayMemories website. The design and user interface of this website are one of the worst I’ve ever seen. But in my opinion, it’s still worth the hassle to get the app. Two tips to avoid the worst problems:
– Get a prepaid PayMemories card instead of paying with a credit card.
– Download the app directly to the camera via WiFi instead of downloading it to the PC and then trying to transfer it via USB to the camera.
The user interface of the app in the camera is also designed very badly. It reacts extremely slowly. Also, most of the settings done in the camera are ignored in the app and have to be set there again.
But the app has also some advantages, which makes it extremely useful. Once set up correctly it operates reliably and is completely self-sufficient without any necessary supervision. It also has a very efficient integrated auto-exposure tracking function. The exposure time (and/or ISO and/or aperture, if you wish) of the camera will be adjusted during a sequence depending on the ambient light. But contrary to just using the A-mode during the sequence, these changes are low-pass-filtered (three different filter options can be chosen). Therefore short events (like a moving cloud in front of the sun) influencing the ambient light will have no impact on the exposure time while longer events (like a sunset or changing weather) will lead to adjusted exposure times. This behavior is perfect for most timelapse applications.
But the biggest advantage of this app is its extremely short dark-time, as shown below in the test results.
There are four reasons to not just always use this app:
1. There is no way to manually adjust the overall exposure of a scene once the sequence had started. If the auto-exposure of the camera makes mistakes (or you just have a different assessment of how a scene should look for aesthetic reasons compared to the auto-exposure) there is no way to correct this during a sequence.
2. If you want to use the app with motion control devices there is no option to limit the maximum exposure time to a value well below the interval time to avoid motion blur induced by the slider movement. It works of course with fixed exposure times but not with auto-exposure.
3. The maximum number of images is limited to 990.
4. The shortest interval is 1 sec. while with the best external intervalometers intervals of 0.5 sec. are possible.
There is one important trick that you need no know if you use this app: If you shoot a day-to-night timelapse and you want to adjust both, the exposure time and ISO during the sequence the best way is to first leave the ISO at the base value (ISO 100 with the Sony A7SII) and just raise the exposure time when the ambient light gets darker until you have reached the maximum possible exposure time for the defined interval. To achieve this with the A7SII you have to set the AUTO ISO Minimum Shutter Speed to the value of the interval time.
I recommend using the following settings with the PlayMemories TL app for a day-to-night timelapse (for more camera settings see above):
– Exposure Mode: A (camera)
– ISO AUTO Minimum: ISO 100 (camera)
– ISO AUTO Maximum: depending on the acceptable noise level, for example, ISO 6400 (camera)
– ISO AUTO Min. SS: = interval time (camera)
– Exposure Comp.: according to the scene and histogram of test images (camera or app)
– Theme: custom (app)
– File Format: Still Images (app)
– Interval: depending on the situation, for day-to-night 5-30 sec. (app)
– Shots: 990, can always be stopped earlier (app)
– AE Tracking Sensitivity: LO (app)
– Self-timer: 2 Sec, just for the start of the sequence (app)
– Interval Priority: On, unless you want to do interval ramping, which I rarely do (app)
– Quality: RAW (app)
– ISO: ISO AUTO (app)
– White Balance: daylight, cloudy, or a fixed value (app)
– Creative Style: Standard (app)
– Monitor Bright. during Shoot.: Normal or Dim, depending on the situation and whether you use an external power pack or not (app)
– Silent Shooting: On, if the subject isn’t moving too fast and there is no artificial light, otherwise Off + EFC On (app)
Test results
The goal of the test was to determine the acceptable worst-case combinations of exposure times and interval times. Slight variations of the interval time during a sequence were considered o.k. while lost frames or continuously blocked operations were classified as clear fails.
Intervalometer Pro Timer 2, Auto Review Off, Silent Shutter, longest exposure time with no lost frames:
0.5 sec. interval time with 1/5 sec. exposure time
1 sec. interval time with 0.5 sec. exposure time
5 sec. interval time with 4 sec. exposure time
=> Dark-time: 0.3-0.5 sec.
Intervalometer Pro Timer 2, Auto Review Off, EFC Shutter, longest exposure time with no lost frames:
0.5 sec. interval time with 1/8 sec. exposure time
1 sec. interval time with 1/3 sec. exposure time
5 sec. interval time with 4 sec. exposure time
=> Dark-time: 0.4-0.7 sec.
Intervalometer Pro Timer 2, Auto Review 2 Sec., manual adjustment of exposure time and/or ISO, Silent Shutter, longest exposure time with no lost frames:
5 sec. interval time with 2.5 sec. exposure time
10 sec. interval time with 6 sec. exposure time
=> Dark-time: 2.5 sec.
Intervalometer Pro Timer 2, Auto Review 2 Sec., manual adjustment of exposure time and/or ISO, EFC Shutter, longest exposure time with no lost frames:
5 sec. interval time with 1.3 sec. exposure time
10 sec. interval time with 6 sec. exposure time
=> Dark-time: 3.7 sec.
Intervalometer Pro Timer 2, Auto Review Off, manual adjustment with ControlMyCamera App of exposure time and/or ISO, Silent or EFC Shutter, longest exposure time with no lost frames:
5 sec. interval time with 2.5 sec. exposure time
10 sec. interval time with 6 sec. exposure time
=> Dark-time: 2.5 sec.
Intervalometer PlayMemories App, M-Mode, Silent or EFC Shutter, longest exposure time with no lost frames:
1 sec. interval time with 1 sec. exposure time
5 sec. interval time with 5 sec. exposure time
=> Dark-time: ~ 0 sec.
Intervalometer PlayMemories App, A-Mode, AET LO, ISO AUTO, Silent or EFC Shutter, longest exposure time with no lost frames:
1 sec. interval time with 1 sec. exposure time
5 sec. interval time with 5 sec. exposure time
=> Dark-time: ~ 0 sec.
Summary
If you choose the wrong combination of interval time and exposure time with the Sony A7SII you will lose frames and ruin your timelapse sequence. If you keep this in mind and know the dark-time limits, the A7SII is a very good camera for time-lapse photography with rather short dark-times and many interesting options.
For situations where the shortest possible interval has the highest priority, use the PRO Timer with a fixed 0.5 sec. interval and a fixed exposure value of 1/5 sec. or shorter is the best combination.
If you want to manually adjust the exposure time and/or ISO during a sequence, either directly on the camera or by using the ControlMyCamera app, you have to ensure a dark-time of at least 2.5 sec. (using the PRO Timer with electronic shutter).
For the longest possible exposure times for a defined interval, it’s best to use the internal PlayMemories time-lapse app. dark-times close to 0 sec. can be achieved with this app, but manual adjustments during the sequence are impossible.
I will use all these different options above for my timelapse photography depending on the scene.

Thank you for this in detail comparison of methods, especially for the “dark time” comparison, a point that I have not noticed so far.
As there is no “perfect” solution I’ll stick with the playmemories App for the moment as the other options (intervalometer, qDDB) don’t satisfy me either. One thing I found with them is, that any external connection, by cable or radio, is another source of possible failure.
Taking this into account, the app is by now the most accepable compromise imho.
Needless to say, the pm apps have offered a very welcome opportunity to get to know and try out photographic techniques, especially for occasional users. It’s a pity that Sony no longer supports this concept.
kind regards, Derek